Introduction
This guide walks you through setting up a Raspberry Pi with OctoPi using an external Wi-Fi adapter, which can be helpful when the Pi is housed in a metal enclosure that obstructs internal Wi-Fi reception.
Before Starting
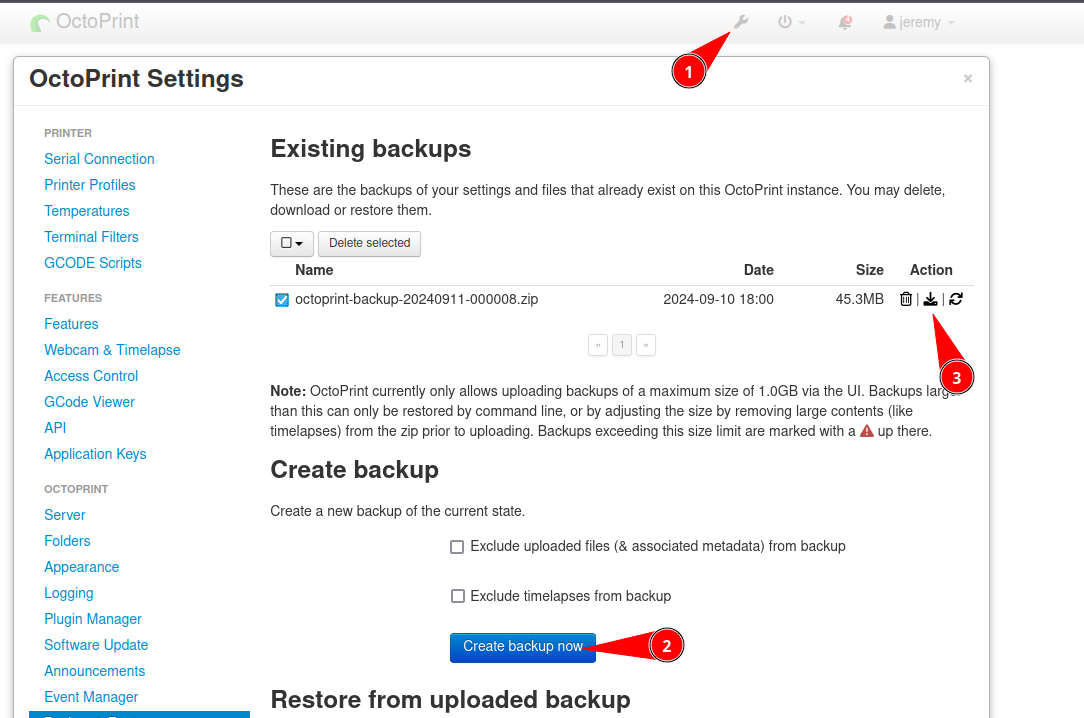
Before you tinker with your existing system, you can backup your existing octopi setup.
You could also make an entire SD card backup using a tool like dd or rpi-clone.
Install OctoPi
The easiest way to install octopi is with rpi-imager available in most linux distributions or directly from their website: https://www.raspberrypi.com/software/
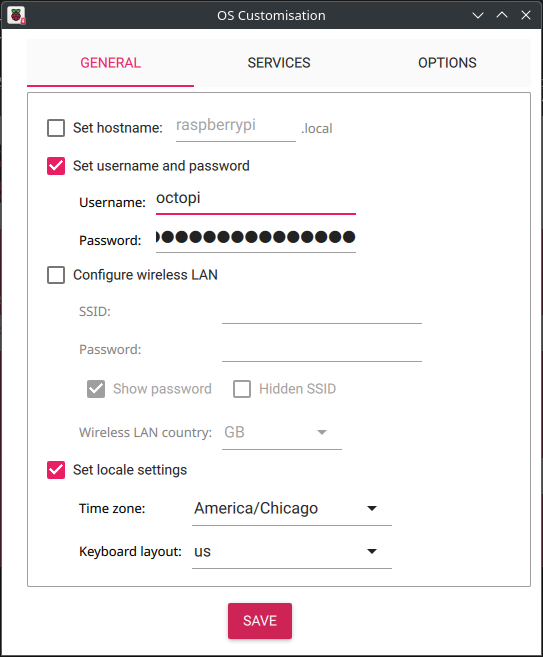
RPi imager already includes octopi as an operating system option. Navigate to Other specific-purpose OS > 3D printing > OctoPi > OctoPi (stable).
When it asks to apply OS customization settings, you can set username and password, but do not provide WiFi information yet.
Edit: Future note, I noticed that /etc/wpa_supplicant/wpa_supplicant.conf is just a symbolic link to /boot/octopi-wpa_supplicant.txt so I suspect it’s okay to enter the information here, but it was not tested.
Disable On Board Wifi
This section is optional, but since I will only ever use the external adaptor, I will disable the internal WiFi chip to prevent future confusion. Only having one active device will remove any uncertainty as to which device is active. I also enabled UART since I use UART to do the initial provisioning.
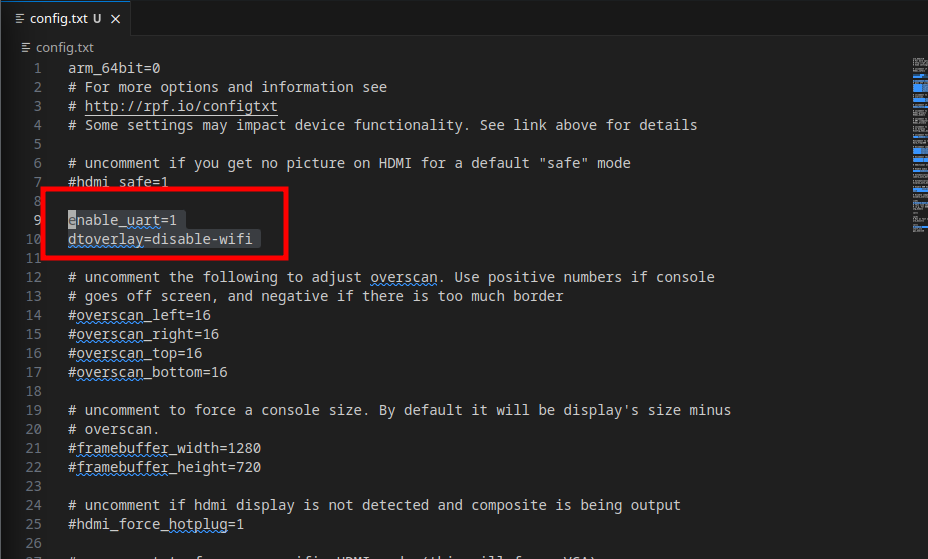
To do this mount the boot partition and make the following edits to config.txt
config.txt
enable_uart=1
dtoverlay=disable-wifi
Once the device boots for the first time you can see that there is only one wireless network interface. If you unplug the external adaptor it goes away.
octopi@octopi:~$ iwconfig
lo        no wireless extensions.

eth0      no wireless extensions.

wlan0     unassociated  ESSID:""  Nickname:"<WIFI@REALTEK>"
          Mode:Auto  Frequency=2.412 GHz  Access Point: Not-Associated
          Sensitivity:0/0
          Retry:off   RTS thr:off   Fragment thr:off
          Power Management:off
          Link Quality=0/100  Signal level=0 dBm  Noise level=0 dBm
          Rx invalid nwid:0  Rx invalid crypt:0  Rx invalid frag:0
          Tx excessive retries:0  Invalid misc:0   Missed beacon:0
Predictable Interface Name
Next I used raspi-config to enabled persistent naming. This is not strictly required but makes things much easier to reason about. This will especially help if the onboard wifi chip is still enabled.
sudo raspi-config
Then navigate to 6 Advanced Options > A4 Network Interface Names. Choose Yes for enable predictable network interface names.
After rebooting run iwconfig again and see that there is now a predictable interface name.
Wifi Config
wpa_supplicant
Next I configured my wifi credentials with wpa_supplicant. I don’t want my password in plain text so use wpa_passphrase to generate the stanza with a password hash.
wpa_passphrase my_ssid_name
Then it will prompt you for the passphrase. For example:
octopi@octopi:/etc/network/interfaces.d$ wpa_passphrase my_ssid_name
# reading passphrase from stdin
my_wifi_password
network={
        ssid="my_ssid_name"
        #psk="my_wifi_password"
        psk=af85804dd416e30daae949bcae27ab6bff05dd2a4a4768488aa65f9d6c63560e
}
octopi@octopi:/etc/network/interfaces.d$
Copy the output of that to /etc/wpa_supplicant/wpa_supplicant.conf
Network Interface
Finally configure /etc/network/interface as shown below. Note if you are using a different wifi chip you may get a different name. You can find the name with:
octopi@octopi:/etc/network/interfaces.d$ ip -c a
1: lo: <LOOPBACK,UP,LOWER_UP> mtu 65536 qdisc noqueue state UNKNOWN group default qlen 1000
    link/loopback 00:00:00:00:00:00 brd 00:00:00:00:00:00
    inet 127.0.0.1/8 scope host lo
       valid_lft forever preferred_lft forever
    inet6 ::1/128 scope host
       valid_lft forever preferred_lft forever
2: eth0: <NO-CARRIER,BROADCAST,MULTICAST,UP> mtu 1500 qdisc mq state DOWN group default qlen 1000
    link/ether dc:a6:32:6d:ab:b8 brd ff:ff:ff:ff:ff:ff
3: wlx08beac1562ff: <NO-CARRIER,BROADCAST,MULTICAST,UP> mtu 1500 qdisc mq state DOWN group default qlen 1000
    link/ether 08:be:ac:15:62:ff brd ff:ff:ff:ff:ff:ff
/etc/network/interfaces:
octopi@octopi:/etc/network/interfaces.d$ sudo vi /etc/network/interfaces
# interfaces(5) file used by ifup(8) and ifdown(8)
# Include files from /etc/network/interfaces.d:
source /etc/network/interfaces.d/*

auto wlx08beac1562ff
allow-hotplug wlx08beac1562ff
iface wlx08beac1562ff inet manual
        wpa-roam /etc/wpa_supplicant/wpa_supplicant.conf

iface default inet dhcp
I have ipv6 enabled on my router, but do not want ipv6 ip on my octopi so I disabled ipv6 by adding the following to the end of /etc/sysctl.conf
net.ipv6.conf.all.disable_ipv6 = 1
net.ipv6.conf.default.disable_ipv6 = 1
net.ipv6.conf.wlx08beac1562ff.disable_ipv6 = 1
Then apply the change:
sudo sysctl -p
Then bring the interface up, remembering to change the adaptor name if needed:
sudo ifup wlx08beac1562ff
Now if you navigate to the ipv4 address you will see octopi. Reminder you can find the ipv4 address by running
ip -c a